Mandatory Prerequisites
Other than Grid rows existing, there are no Mandatory Prerequisites related to using a Grid.
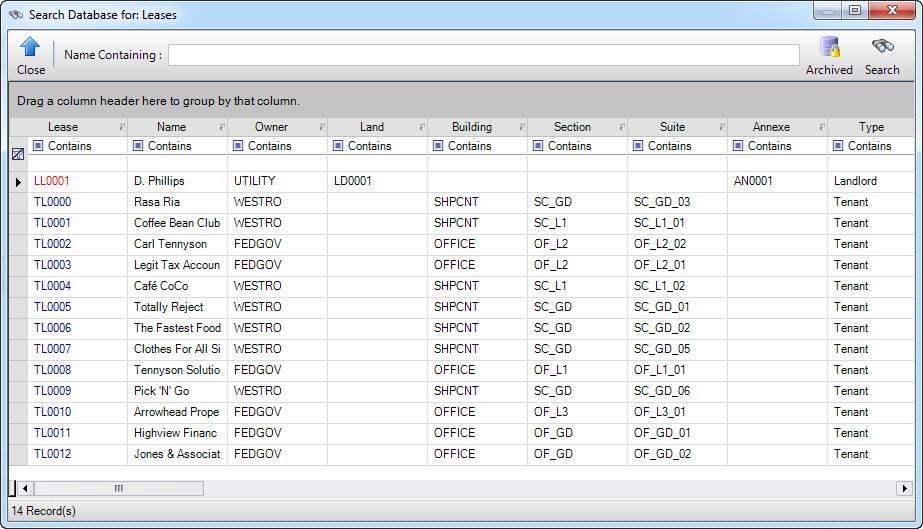
Screenshot of a Typical Grid: example - Lease
Grid Contents:
Row: Each horizontal row in this Grid represents an individual Lease record.
Column: The vertical columns in this Grid relate to the fields within Lease records.
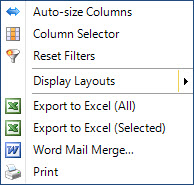
Screenshot of Grid Maintenance Options:
Screenshot of Word Mail Merge Options:
Screenshot of Grid Display Layouts:
How Do I : Load a Grid: example - Lease
- Although the example described in this document relates to the Search Grid of a Lease entity, most of it's properties are common to all Grids.
How Do I : Re-arrange Columns in a Grid
- Columns can be rearranged in any order.
- Refer to "How Do I : Load a Grid: example - Lease" to open the Lease Search function.
- To reposition the Type column to appear between the Name and Owner columns, click and drag the Type column header until 2 arrows appear between the Name and Owner columns, then release.
- Refer to "How Do I : Save the Grid Layout" to save the changes to the layout of the grid.
How Do I : Lock Columns in a Grid
- Locking shifts selected columns to the left of the Grid and keeps them "on screen" when horizontal scrolling occurs.
- Refer to "How Do I : Load a Grid: example - Lease" to open the Lease Search function.
- Click on one or more of the (tiny) grey pin icons situated on the right hand side of column Headers.
- The pin icon(s) will change to green.
- The column(s) will automatically move to the left of the Grid.
- A vertical border will appear at the right of the right most locked column.
- When scrolling horizontally, the locked columns will remain visible.
- Refer to "How Do I : Save the Grid Layout" to save the changes to the layout of the grid.
How Do I : Unlock Columns in a Grid
- Unlocking releases selected locked columns but will not return them to their original column positions.
- Refer to "How Do I : Load a Grid: example - Lease" to open the Lease Search function.
- Click on one or more of the (tiny) green pin icons situated on the right hand side of column Headers.
- The pin icon(s) will change to grey.
- The column(s) will remain where they are.
- The vertical border will disappear or shift to the right of the right most locked column.
- The previously locked column(s) will now scroll horizontally.
- Refer to "How Do I : Save the Grid Layout" to save the changes to the layout of the grid.
How Do I : Split a Grid Vertically or Horizontally
- Splitting the Grid allows you to divide it into as many panes as desired so that different parts can be viewed simultaneously.
- The columns in each pane scroll independently.
- Splitting the view is a good way to manage and navigate large Grids.
- Refer to "How Do I : Load a Grid: example - Lease" to open the Lease Search function.
- Splitter controls appear as (tiny) rectangular icons at the bottom left and top right of Grids.
- The vertical splitter causes the cursor to show up/down arrows.
- The horizontal splitter causes the cursor to show left/right arrows.
- Click/drag/release the bottom left control left/right to create a vertical split. A vertical line will indicate the split.
- Click/drag/release the top right control up/down to create a horizontal split. A horizontal line will indicate the split.
- To reverse the split, click/drag/release a split line (vertical or horizontal) to the edge of the screen.
- Refer to "How Do I : Save the Grid Layout" to save the changes to the layout of the grid.
How Do I : Sort a Grid Column into Ascending or Descending Sequence
- The initial sequence of the Grid columns is determined by the application.
- A selected column can be sorted in ascending or descending order.
- Refer to "How Do I : Load a Grid: example - Lease" to open the Lease Search function.
- Click on a column heading.
- A small arrow will appear indicating whether the data is being sorted in ascending (Arrow up) or descending (Arrow down) order.
- Note the order of data in other columns.
- Refer to "How Do I : Save the Grid Layout" to save the changes to the layout of the grid.
How Do I : Create a Filter on a Grid
- You can define filters for Grids.
- There are simple filters and custom filters.
- Custom filters is a relatively specialised feature and is intended for advanced users of the system.
- The relatively simple example below creates a filter for a specified Owner's Leases with Stop Dates beyond a given Date.
- Refer to "How Do I : Load a Grid: example - Lease" to open the Lease Search function.
- In the first row under the Owner column heading, select = Equals from the list of options.
- In the second row under the Owner column heading, select WESTRO from the list of options.
- At this point the Grid will only display Leases with an Owner of WESTRO.
- In the first row under the Stop Date column heading, select > Greater than from the list of options.
- In the second row under the Stop Date column heading, select 04-Nov-2014 from the calendar.
- Now the Grid will only display Leases with an Owner of WESTRO and Stop Dates greater than 04-Nov-2014.
- Refer to "How Do I : Save the Grid Layout" to save the changes to the layout of the grid.
How Do I : Reset Filters on a Grid
- If a Grid has a custom filter applied and the filter is no longer required then the ”Reset Filters” option can be used.
- Right click anywhere on the Grid to open the Screenshot of Grid Maintenance Options:
- Select Reset Filters.
How Do I : Arrange Selected Grid Columns into a Hierarchy of Groups
- This function allows you to arrange selected Grid columns into a hierarchy.
- The example below shows how to arrange a hierarchy of Buildings within Land within Owners.
- Refer to "How Do I : Load a Grid: example - Lease" to open the Lease Search function.
- Note the target area in the Grid marked: "Drag a column header here to group by that column".
- Click and drag the column header Owner into the target area.
- The Grid's appearance will change and Owners will be listed with accompanying + keys.
- Clicking on a + key will expand into rows belonging to that Owner.
- Clicking on a - key will condense into a single Owner row again.
- Click and drag the column header Land into the target area after Owner.
- Click and drag the column header Building into the target area after Land.
- Note how the hierarchy now shows Buildings within Land within Owners.
- To reverse this process, simply drag a group from the target area back to a position amongst the column headers.
- Refer to "How Do I : Save the Grid Layout" to save the changes to the layout of the grid.
How Do I : Save the Grid Layout
- The layout of data in a Grid can be saved for future reference.
- Saving a Grid layout preserves the following:
- Column settings.
- Splits.
- Sorts and Filters (including custom Filters).
- Group hierarchies.
- Refer to "How Do I : Load a Grid: example - Lease" to open the Lease Search function.
- Right click anywhere on the Grid to open the Screenshot of Grid Maintenance Options:
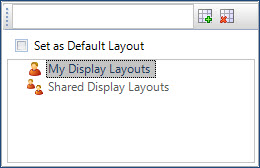
- Click on [Display Layouts] to open the Screenshot of Grid Display Layouts:
- In the text box of the sub menu, enter a descriptive name for the layout.
- Click the Set as Default Layout check box if you want the Grid to always default to this layout.
- Click on the Green Grid symbol to save the layout.
- If you have sufficient operator privileges, on saving, a message box will appear asking whether to save the layout for all operators. Click [Yes] to allow other operators of the system to access this layout. Click [No] to restrict the layout to your operator account.
How Do I : Use a Saved Grid Layout
- You can use any previously saved Personal or Shared Grid layouts.
- Refer to "How Do I : Load a Grid: example - Lease" to open the Lease Search function.
- Right click anywhere on the Grid to open the Screenshot of Grid Maintenance Options:
- Click on [Display Layouts] to open the Screenshot of Grid Display Layouts:
- Click on the My Display Layouts or Shared Display Layouts option.
- If you cannot see your saved layouts, click on the [+] symbol to expand the view.
- Double click on the layout required.
- This will automatically reformat the Grid with the saved layout.
How Do I : Export a Grid to Microsoft Excel
- You can export any Grid to a Microsoft Excel spreadsheet.
For this feature to work you must have a version of Microsoft Excel installed on your computer.
- Refer to "How Do I : Load a Grid: example - Lease" to open the Lease Search function.
- Right click anywhere on the Grid to open the Screenshot of Grid Maintenance Options:
- To export every row in the Grid select Export to Excel (All)
- Or to export selected rows from the Grid select Export to Excel (Selected).
- The data will automatically be transferred to an Excel spreadsheet. Every column in the Grid is exported and any group and/or filter that has been applied to the Grid will also be exported.
How Do I : Use the Grid for a Microsoft Word Mail Merge
- You can use any Grid for a Microsoft Word Mail Merge.
For this feature to work you must have a version of Microsoft Word installed on your computer.
- Refer to "How Do I : Load a Grid: example - Lease" to open the Lease Search function.
- Right click anywhere on the Grid to open the Screenshot of Grid Maintenance Options:
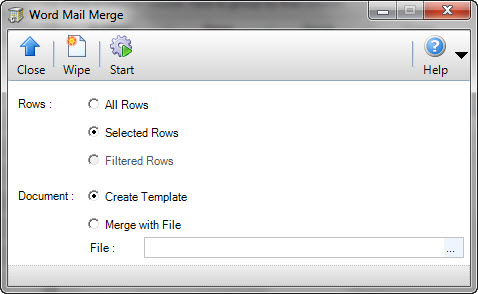
- Select Word Mail Merge.
- The preceding row selection options will appear in the Screenshot of Word Mail Merge Options:
- If a template Mail Merge file has not been created, select the Create Template option and click the Application tool-bar push button: Start button. Microsoft Word will open with a new document populated with the columns from the Grid. Format the document as required and save the file.
- If a template Mail Merge file has been created, and the data in the Grid is to be used to populate the template file, select the Merge with File option.
- Find where the template file has been saved using the File field.
- Click the Application tool-bar push button: Start. The data will automatically populate the Mail Merge file.
Because the printing process prints the Grid as it appears on screen you should first arrange the Grid to your particular preferences.
- Refer to "How Do I : Load a Grid: example - Lease" to open the Lease Search function.
- Right click anywhere on the Grid to open the Screenshot of Grid Maintenance Options:
- Select Print to start printing the Grid.
Grids are associated with the following Topics: