Open topic with navigation
Running the Budget Preparation Process
- The Budget Preparation process allows the users to create multiple budget work sheets with different assumptions before saving to the final budget.
- Budget work sheets can be broken down for a combination of Chart of Accounts and Properties.
- Budget work sheets can be automatically populated based on previous actuals, budgets and forecasts by setting up Budget COA Profiles.
- The user also has the ability to manually enter or edit budget amounts and enter commentary on the amounts.
Menu
| Financials |
> |
Budget Preparation |
Mandatory Prerequisites
Prior to running the Budget Preparation Process, refer to the following Topics:
- Property - one of Owner, Land, Building, Section, Suite, Annexe or Lease is required.
Screenshot and Field Descriptions
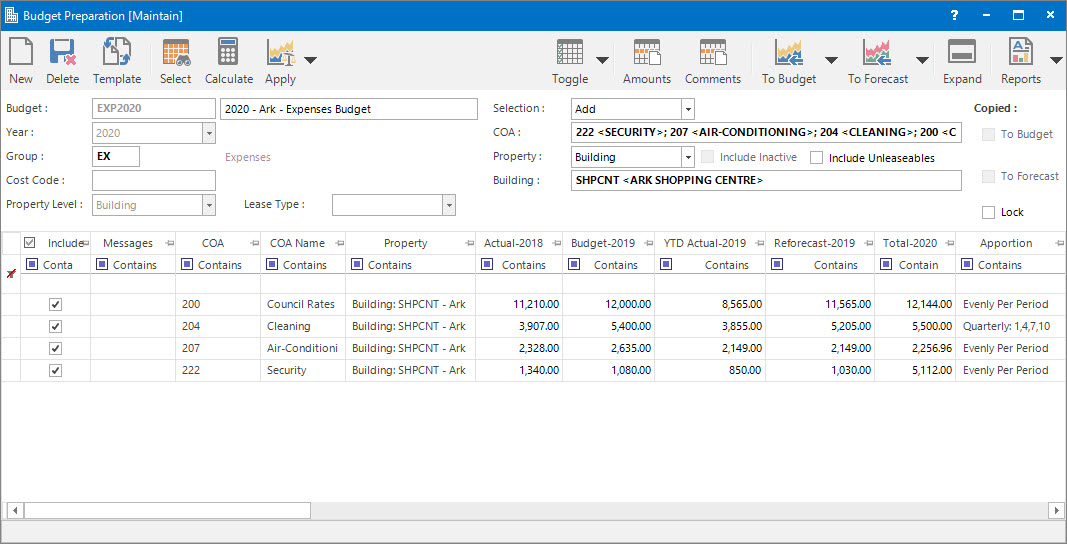
 Budget: this is the primary identifier for the Budget.
 Name: this is the friendly name given to the Budget.
 Year: this is the Accounting Year for Budget preparation.
Group: this is the Budget / Forecast Group to filter on.
Cost Code: this is the Cost Code for the Budget.
Property Level: this is a drop down list for selecting the level of Property to prepare the Budget for.
Lease Type: this is the type of Lease for the Budget preparation. This field is only available when Lease is selected for the Property Level.
Selection: this is the type of action to perform on the Budget preparation work sheet. The options are:
- Add: this is to add COAs / Properties to the work sheet.
- Delete: this is to remove COAs / Properties from the work sheet.
COA: this is the Chart of Account for the Budget.
Property: this is the drop down list of the Properties that the selection can be filtered on. Select a value from the drop down list and the appropriate filter field will be displayed.
If no selection is made on the COA / Property fields, then all the COAs / Properties will be selected for the Budget. Making selections on the COA / Property fields will allow the users to create the Budget work sheet just for the selected COAs / Properties.
Include Inactive: this check box determines if the inactive component lines on the Leases will be included in the Budget preparation.
Include Unleaseable: this check box determines if the unleaseable Properties will be included in the Budget preparation.
Copied
To Budget: this check box displays if the Budget preparation data has been copied to the Budget screen.
To Forecast: this check box displays if the Budget preparation data has been copied to the Forecast screen.
Lock: this check box is ticked to set the lock values on the Budget when the values are copied across to the Budget / Forecast.
Budget Preparation Preview table: this will be populated with the lines to enter Budget amounts for. The check box in the Include column can be ticked to include / exclude rows in the grid.
How Do I : Set up the Budget Preparation Work Sheet Area ready to use
- At the Budget field, enter a new Budget ID.
- At the Name field, enter the name of the Budget.
- The Year field value will default to the current Accounting Year. Change the value if the Budget needs to be created for a different accounting year.
- At the Group field, locate the Budget group you would like to assign this Budget to.
- At the Cost Code field, select the cost code for this Budget if required.
- Select a value from the Property Level drop down list. If Lease is selected, then select a value from the Lease Type drop down list if required.
- At the Selection field, select the required action to perform from the drop down list.
- At the COA field, select the required Chart of Accounts.
- At the Property field, select the required Property type from the drop down list and enter the Property.
- Click the Application tool-bar push button: Select to populate the Budget Preparation Preview table.
- At his point the Application tool-bar push button: Add can be pressed to save the work area.
How Do I : Modify the Budget Work Area
Refer to Running the Budget Preparation Process:
- At this point, other COA or Properties need to be added to / deleted from the Budget, at the Selection field, select the Add or Delete options from the drop down list and enter the required COA and Properties.
- Tick the Include Inactive check box, if inactive lease components need to be included in the Budget.
- Tick the Include Unleaseable check box, if unleaseable properties need to be included in the Budget.
- Click the Application tool-bar push button: Select to populate the Budget Preparation Preview table.
- At this point, the user can refer to How Do I : Calculate and populate Previous Year amount columns to generate previous amounts, or, refer to How Do I : Apply Budget COA Profiles to automatically calculate the Budget amounts to calculate the budget amounts based on the Budget COA Profiles in the work area of the Budget Preparation Preview table.
- If required, the user can refer to How Do I : Manually enter the Budget amounts to manually enter budget amounts in the work area of the Budget Preparation Preview table.
- Tick off the check box in the Include column if any lines needs to be exclude from the grid.
- Alternatively, refer to How Do I : Select particular Budget records to process to select particular budget records from the Budget Preparation Preview table to process.
- Click the Application tool-bar push button: Change.
- Confirm that you wish to change the record.
How Do I : Delete an existing Budget Work Area
- At the Budget field, locate the Budget.
- Click the Application tool-bar push button: Delete and confirm that you wish to delete the record.
How Do I : Calculate and populate Previous Year amount columns
Refer to Running the Budget Preparation Process and Refer to How Do I : Modify the Budget Work Area:
- At this point the Application tool-bar push button: Calculate can be pressed to populate the following columns:
- Actual (2 years previous): this is the last full year of actual transaction amounts.
- Budget (previous year): this is the previous year Budget figures.
- YTD Actual (previous year): this is the actual transactions for the current year up until the last accounting period marked as the current period.
- Reforecast (previous year): this is the YTD actual plus the Forecast figures for the remainder of the year.
- Click the Application tool-bar push button: Change.
- Confirm that you wish to change the record.
How Do I : Apply Budget COA Profiles to automatically calculate the Budget amounts
Refer to Running the Budget Preparation Process and Refer to How Do I : Modify the Budget Work Area:
- At this point the Application tool-bar push button: Apply can be pressed and the amounts will be calculated from previous years as specified in the Budget COA Profile for the COA and Property.
- Click the Application tool-bar push button: Change.
- Confirm that you wish to change the record.
How Do I : Select particular Budget records to process
Refer to Running the Budget Preparation Process and Refer to How Do I : Modify the Budget Work Area:
- At this point, to select particular Budget records the Application tool-bar push button: Toggle provides the following options:
- Toggle 'Include' - All Rows: this option includes all Budget records.
- Toggle 'Include' - Visible Rows: this option includes only the visible Budget records.
- Toggle 'Include' - Selected Rows: this option includes only the selected Budget records.
- Clicking the Application tool-bar push button: Toggle changes the default selection of rows, when the check box in the Include column is ticked on the Budget Preparation Preview table.
- Click the Application tool-bar push button: Change.
- Confirm that you wish to change the record.
How Do I : Manually enter the Budget amounts
Refer to Running the Budget Preparation Process and Refer to How Do I : Modify the Budget Work Area:
- At this point the budget amounts can be entered directly into the Budget Preparation Preview table.
- In the Total column, enter the Budget amount for the year.
- In the Apportion column, select the apportion method to apportion the Budget amount evenly across periods, quarterly, half-yearly or yearly. If required, the amounts for each period can also be changed in the columns between Period-1 to Period-12.
- In the Comments column, enter any additional comments relating to the Budget.
- Click the Application tool-bar push button: Change.
- Confirm that you wish to change the record.
How Do I : Copy amounts to final Budget / Forecast
Refer to How Do I : Set up the Budget Preparation Work Sheet Area ready to use and Refer to How Do I : Modify the Budget Work Area:
- At any point, tick the Application tool-bar push button: To Budget or the Application tool-bar push button: To Forecast to copy the amounts to the Budget / Forecast area of the program. By default, only future accounting periods will be copied.
- If a row is successfully copied, the Copied to Budget or Copied to Forecast column at the end of the Budget Preparation Preview table will be ticked.
- If all rows are successfully copied the To Budget or the To Forecast check boxes on the screen will be ticked.
- If a Budget / Forecast record already exists it will be overwritten unless the Lock check box has been ticked on.
- Click the Application tool-bar push button: Change.
- Confirm that you wish to change the record.
Related Topics
Budget Preparation Process is associated with the following Topics: