Open topic with navigation
Maintaining Leases
- The Lease defines the contractual relationship between the Lease a/c (Tenant / Landlord) and the property.
- The following properties can be leased:
- Land
- Building
- Section
- Suite
- Annexe
- Multiple properties can be covered by a single Lease.
- A Lease with a debtor is a Tenant Lease.
- A Lease with a creditor is a Landlord Lease.
Menu
Mandatory Prerequisites
Prior to creating a Lease, refer to the following Topics:
Screenshot and Field Descriptions: Lease Tab
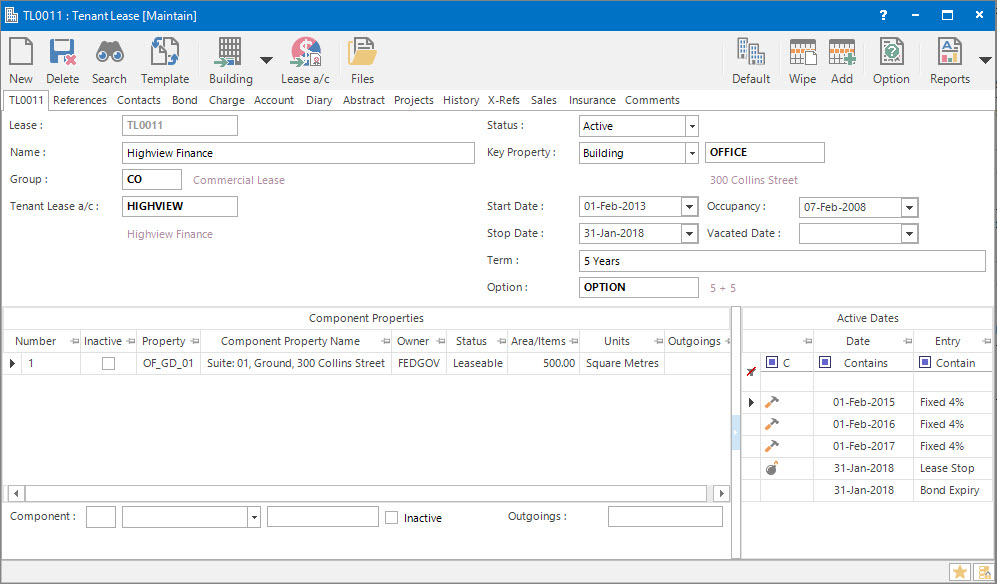
 Lease: this is the primary identifier for the Lease.
 Name: this is the friendly name given to the Lease.
Group: this determines the Group that the record belongs to. Groupings are useful in searches and reports.
 Lease a/c: this is the Lease a/c (Tenant / Landlord) that you will be attaching to the Lease.
Status: this is the current status of the Lease. The options are:
- Pre-Lease - Allows the Lease to be set up prior to it becoming an actual lease.
- Active - Indicates that the Lease is current.
- Overholding - Indicates that the Lease has gone past the expiry date but is still Active.
- Terminated - the Lease is no longer.
- Vacated - the Lease has ended but monies are still to be finalised.
Key Property: this is the Property which the Lease is a part of. It is a reference only field and does not need to be the property that the Lease is directly linked to. The Component Properties area at the bottom of the screen is where the Lease is directly linked to the properties it is for.
Start Date: this is the start date of the current term of the Lease.
Stop Date: this is the end date of the current term of the Lease.
Occupancy: this is the original date of occupancy.
Vacated: this is the final date of vacancy.
Term: this is the duration of the current term of the Lease. This field will automatically populate with the number of years, months and days when the Start Date and Stop Date fields are entered.
Option: this is the Option Profile that you will be attaching to the Lease. The Option Profile details out the options available (extend or end Lease) once the current term of the Lease expires.
Component Properties table: this is populated with the Properties the Lease is for.
Component: this is where the Properties which the Lease is directly linked to can be specified.
Inactive: this check box is to nominate if a Property is no longer an active part of the Lease.
Outgoings: this is for the Outgoings Profile that can be attached to the Property component. The Outgoings Profile details out the settings for the calculation of the outgoings expenses associated with the property.
Active Dates table: this is populated with all the Active Diary dates entered in the Diary for the Lease. It is reference only.
Screenshot and Field Descriptions: Bond Tab
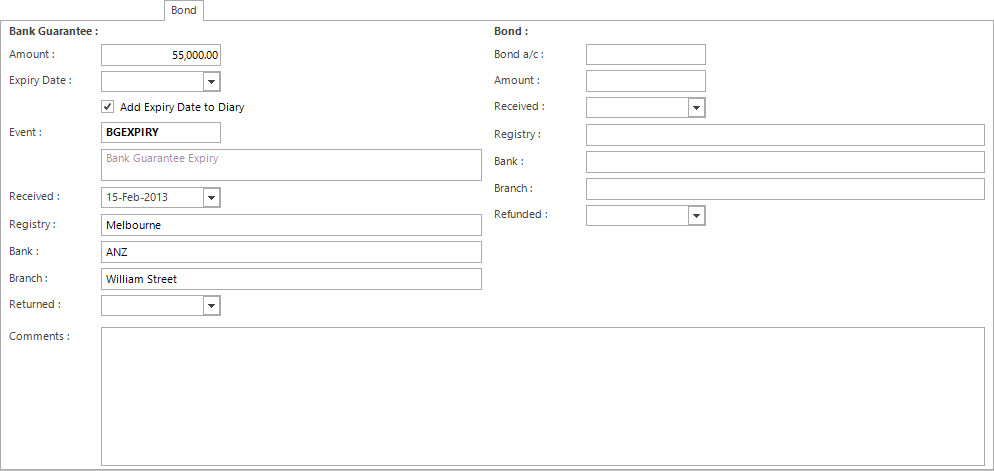
Bank Guarantee
Amount: this is the Amount of the Guarantee.
Expiry Date: this is the Expiry Date of the Guarantee.
Add Expiry Date to Diary: tick to automatically save the Expiry Date to the Lease Diary.
Event: this is the Event ID that will be used for the Expiry Date in the Lease Diary. It is required if Add Expiry Date To Diary is ticked.
Received: this is the Date the Guarantee was received.
Registry: this is a Registry Reference field.
Bank: this is the Bank associated with the Guarantee.
Branch: this is the Bank Branch associated with the Guarantee.
Returned: this is the Date the Guarantee was returned.
Bond
Bond Account: this is the Account to which the Bond has been deposited.
Amount: this is the Amount of the Bond.
Received: this is the Date the Bond Amount was received.
Registry: this is a Registry Reference field.
Bank: this is the Bank associated with the Bond.
Branch: this is the Bank Branch associated with the Bond.
Refunded: this is the Date the Bond Amount was refunded.
Comments: this is a free text field to record any further comments.
Although the system allows both to be entered, usually Bonds are held either as a Bank Guarantee or in a Bond Account.
Screenshot and Field Descriptions: Sales Tab
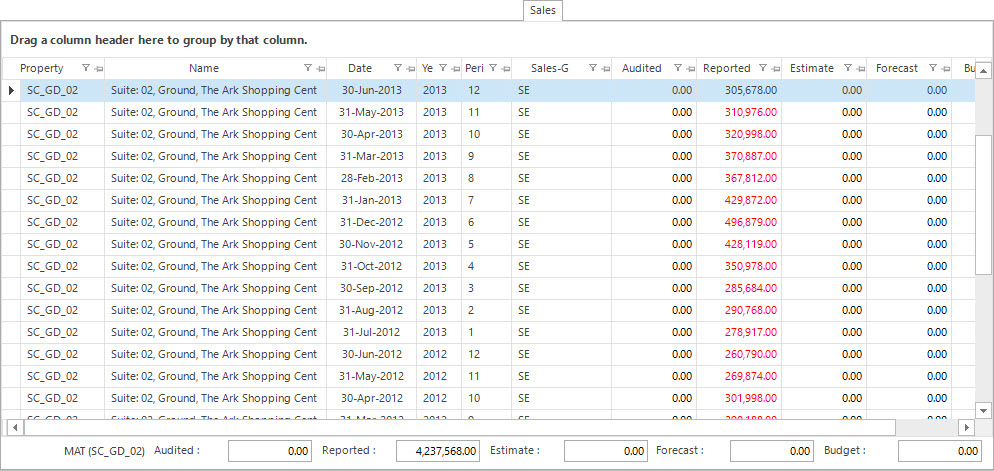
Sales table: this contains rows of Sales records for the Lease. Double click a row to open the record in the Sales Maintenance function.
Select one row and the MAT (Moving Annual Turnover) will display in the totals fields below the table.
Selecting more than one row will display the Selected Total in the fields below the table.
Shared or Site Optional Tabs
Other than Tabs described specifically in this Topic, the following may also be available (depending on Site Settings):
How Do I : Search For and Maintain Entities
These General Rules are described in the Fundamentals Manual: How Do I : Search For and Maintain Entities
How Do I : Add a new Lease
- At the Lease field, enter a new Lease ID.
- At the Name field, enter the name of the Lease.
- At the Group field, enter the Lease Group you would
like to assign this Lease to.
- At the Lease a/c field, locate the Lease a/c for this Lease. The Lease a/c label name will change to Tenant Lease a/c or Landlord Lease a/c depending on which type of Lease a/c is selected.
- At the Status option, select the appropriate value from the drop down list.
- At the Key Property field, select the Property type from the drop down list. In the text box next to this field, locate the Key Property for this Lease.
- At the Start Date field, enter the start date of the current term of the lease.
- At the Stop Date field, enter the expiry date of the current term of the lease.
- At the Occupancy field, enter the original date of occupancy.
- At the Vacated Date field, enter the final date of vacancy, if known.
- The Term field, will have automatically populated. Change if required.
- At the Option field, locate the Option Profile for this Lease.
- Refer to How Do I : Add a Component Property to a Lease to add Component Properties.
- Switch to the References tab, and if there are fields available, enter any additional
information required.
- Switch to the Bond tab, and enter any additional
information required.
- Switch to the Comments tab, and enter any additional comments relating to the Lease.
- Click the Application tool-bar push button: Add.
- Confirm that you wish to add the new record.
The system attaches a record number to each Component as an internal reference only. As you add or delete Components the number will increment.
How Do I : Modify an existing Lease
- At the Lease field, locate the Lease.
- In the Name field, enter the name of the Lease.
- In the Group field, enter the Lease Group you would
like to assign this Lease to.
- At the Lease a/c field, locate the Lease a/c for this Lease. The Lease a/c label name will change to Tenant Lease a/c or Landlord Lease a/c depending on which type of Lease a/c is selected.
- At the Status option, select the appropriate value from the drop down list.
- At the Key Property field, select the Property type from the drop down list. In the text box next to this field, locate the Key Property for this Lease.
- At the Start Date field, enter the start date of the current term of the lease.
- At the Stop Date field, enter the expiry date of the current term of the lease.
- At the Occupancy field, enter the original date of occupancy.
- At the Vacated Date field, enter the final date of vacancy, if known.
- The Term field, will have automatically populated. Change if required.
- At the Option field, locate the Option Profile for this Lease.
- Refer to How Do I : Modify an existing Component Property on a Lease to change Component Properties or How Do I : Delete a Component Property from a Lease to remove Component Properties.
- Switch to the References tab, and if there are fields available, enter any additional
information required.
- Switch to the Bond tab, and enter any additional
information required.
- Switch to the Comments tab, and enter any additional comments relating to the Lease.
- Click the Application tool-bar push button: Change.
- Confirm that you wish to change the record.
How Do I : Delete an existing Lease
- At the Lease field, locate the Lease.
- Click the Application tool-bar push button: Delete.
- Confirm that you wish to delete the record.
A Lease record can only be deleted if there are no other records associated
with it. An example of an associated record might be a Diary record.
How Do I : Add a Component Property to a Lease
- At the Lease field, locate the Lease.
- At the Component Type field, select the Component Property type.
- At the Component Property field, locate the Component Property.
- If the Component Property is no longer an active part of the Lease, tick the Inactive check box.
- At the Outgoings field, locate the Outgoings Profile for this Component Property.
- Click the Right Hand Side Application tool-bar push button: Add.
- Repeat these steps to add more Component Properties.
- Click the Application tool-bar push button: Change.
- Confirm that you wish to change the record.
Note: The default system setting is a Property can only be attached to one Active Lease at a time.
How Do I : Modify an existing Component Property on a Lease
- At the Lease field, locate the Lease.
- Double click the row in the Component Properties table to change.
- At the Component Type field, select the Component Property type.
- At the Component Property field, locate the Component Property.
- If the Component Property is no longer an active part of the Lease, tick the Inactive check box.
- At the Outgoings field, locate the Outgoings Profile for this Component Property.
- Click the Right Hand Side Application tool-bar push button: Change.
- Repeat these steps to change more Component Properties.
- Click the Application tool-bar push button: Change.
- Confirm that you wish to change the record.
How Do I : Delete a Component Property from a Lease
- At the Lease field, locate the Lease.
- Double click the row in the Component Properties table to delete.
- Click the Right Hand Side Application tool-bar push button: Delete.
- Repeat these steps to delete more Component Properties.
- Click the Application tool-bar push button: Change.
- Confirm that you wish to change the record.
How Do I : Add the Bank Guarantee Expiry Date to the Lease Diary
- When entered, the Bank Guarantee Expiry Date can be automatically added to the Lease Diary in order to remind the user when it becomes due.
- At the Lease field, locate the Lease.
- Switch to the Bond tab.
- In the Bank Guarantee section, tick the Add Expiry Date To Diary check box.
- At the Event field, locate the Event ID that will be used for the Expiry Date in the Lease Diary.
- Enter in the remaining fields as required.
- To save the changes made, click the Application tool-bar push button: Change.
- Confirm that you wish to change the record.
- Switch to the Diary tab to see the Expiry Date added to the Lease Diary.
Related Topics
Leases are associated with the following Topics: