Open topic with navigation
Maintaining Counters
- A Counter can be attached to a Property and be used to store periodic amounts against it for reporting purposes.
- An example for a use of a counter is for recording the entries into a property through a door or gate.
Menu
Mandatory Prerequisites
Prior to creating a Counter, refer to the following Topics:
- Property - one of Land, Building, Section, Suite or Annexe is required.
Screenshot and Field Descriptions: Counter Tab
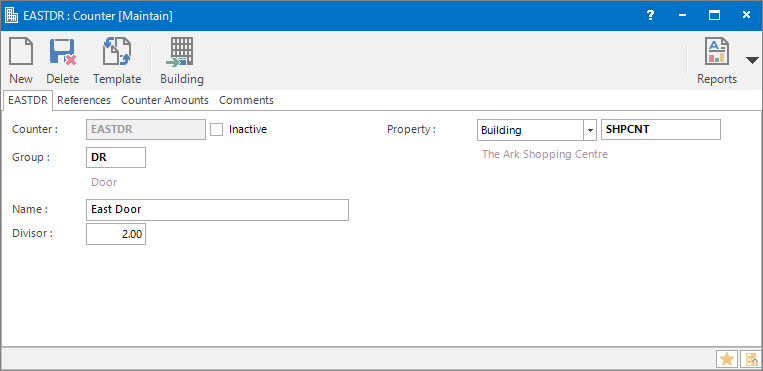
 Counter: this is the primary identifier for the Counter.
Inactive: this check box is to nominate that the Counter is no longer active.
Group: this determines the Counter Group that the Counter belongs to, and is used
mostly in Counter reporting scenarios, e.g. the Counter List report.
 Name: this is the friendly name given to the Counter. Examples might be ”North Entrance”, or ”Car Park Entrance 1”.
Divisor: this is a number that the Counter Amounts will be divided by for reporting purposes. For example it might be entered as "2" on a door counter to only count a person entering and exiting once.
Property: this is the Property which the Counter is linked to.
Screenshot and Field Descriptions: Counter Amounts Tab

Counter Amounts table: this contains rows of Counter Amount records for the Counter.
Shared or Site Optional Tabs
Other than Tabs described specifically in this Topic, the following may also be available (depending on Site Settings):
How Do I : Add a new Counter
- At the Counter field, enter a new Counter ID.
- If the Counter is no longer active, tick the Inactive check box.
- At the Group field, locate the Counter Group you would
like to assign this Counter to.
- At the Name field, enter the name of the Counter.
- At the Divisor field,
enter the number to divide Counter Amounts by for reporting purposes.
- At the Property field, select the Property type from the drop down list. In the text box next to this field, locate the Property value the Counter is linked to.
- Switch to the References tab, and if there are fields available, enter any additional
information required. Keep in mind that fields with a bold title are considered
mandatory.
- Switch to the Comments tab, and enter any additional comments relating to the Counter.
- Click the Application tool-bar push button: Add.
- Confirm that you wish to add the new record.
How Do I : Modify an existing Counter
- At the Counter field, locate the Counter.
- If the Counter is no longer active, tick the Inactive check box.
- At the Group field, locate the Counter Group you would
like to assign this Counter to.
- At the Name field, enter the name of the Counter.
- At the Divisor field,
enter the number to divide Counter Amounts by for reporting purposes.
- At the Property field, select the Property type from the drop down list. In the text box next to this field, locate the Property value the Counter is linked to.
- Switch to the References tab, and if there are fields available, enter any additional
information required. Keep in mind that fields with a bold title are considered
mandatory.
- Switch to the Comments tab, and enter any additional comments relating to the Counter.
- Click the Application tool-bar push button: Change.
- Confirm that you wish to change the record.
How Do I : Delete an existing Counter
- At the Counter field, locate the Counter.
- Click the Application tool-bar push button: Delete.
- Confirm that you wish to delete the record.
A Counter record can only be deleted if there are no other records associated
with it. An example of an associated record might be a Counter Amount record, or an
Audit entry.
Related Topics
Counters are associated with the following Topics: