Open topic with navigation
Maintaining Contacts
- Contacts are individuals who can be associated with multiple Entities in the system.
- The system provides a set of Customer Relationship Management (CRM) tools that allow you to manage your relationship with these individuals.
Menu
Mandatory Prerequisites
Prior to creating a Contact, refer to the following Topics:
Screenshot and Field Descriptions: Contact Tab
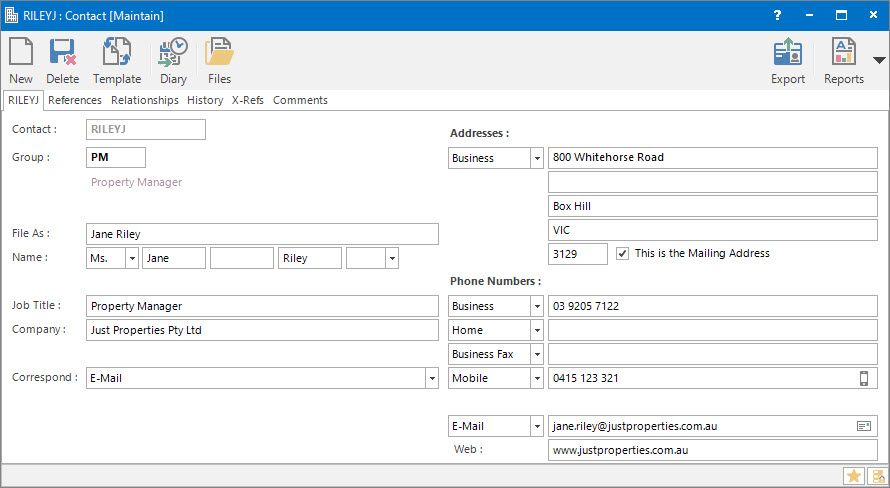
 Contact: this is the primary identifier for the Contact.
Group: this determines the Contact Group that the record belongs to. Groupings are useful in searches and reports.
 File As: this is the friendly name of the Contact record.
Name: this is the name of the Contact. It is broken down into: Title, First Name, Middle Name, Surname and Suffix.
Job Title: this is Contact's Job Title.
Company: this is the Contact's Company.
Correspond: this is a drop down list of options for the Contact's preferred method of receiving correspondence.
Addresses: this is a drop down list of the types of addresses that can be stored. An address can be entered for each type.
Address / Post Code: this is the address for the Contact for the selected Addresses type.
This is the Mailing Address: click this check box if the address is where mail should be sent to.
Phone Numbers: this is multiple drop down lists of types of phones numbers that can be stored. A phone number can be entered for each type. There are four fields the user can select to display as a default.
E-Mail: this is a drop down list of the number of e-mail addresses that can be stored. An e-mail address can be entered for each number.
Web: this is the Contact's company web page address.
Screenshot and Field Descriptions: Relationships Tab

Relationships Table: this table contains rows of Entities which have a relationship with the Contact.
- Select a row to enable the Application tool-bar push button: GoTo> Entity button.
- Double click a row to populate the fields below the table for editing.
Type: this is a drop down list of Entity types to record the Relationship entry for.
Entity: this is the Entity the Relationship entry is with.
Relationship: this is the Relationship the Contact has with the Entity.
From: this is the start date of the Relationship.
To: this is the optional end date of the Relationship.
Active: tick this check box to nominate that this Contact Relationship is active.
Shared or Site Optional Tabs
Other than Tabs described specifically in this Topic, the following may also be available (depending on Site Settings):
How Do I : Search For and Maintain Entities
These General Rules are described in the Fundamentals Manual: How Do I : Search For and Maintain Entities
How Do I : Add a new Contact
- At the Contact field, enter a new Contact ID.
- At the Group field, locate the Group you would
like to assign this Contact to.
- At the File As field, enter the name of the Contact record.
- At the Name field, enter the Title, First Name, Middle Name, Surname and Suffix where required.
- At the Job Title field, enter the Contact's job title.
- At the Company field, enter the company name the Contact works for.
- From the Correspond drop down list, select the method the Contact prefers to receive correspondence by.
- Select an address type from the Addresses drop down list, then enter the relevant information in the Address / Post Code fields.
- Click the This is the Mailing Address check box if the address is where mail should be sent to.
- Select from the four Phone Numbers drop down lists and enter the relevant information in the phone number fields.
- Select from the E-Mail drop down list and enter in the relevant e-mail address.
- At the Web field, enter the web address for the company the Contact works for.
- Refer to How Do I : Add a Contact Relationship to link the Contact to an Entity to add Contact Relationships.
- Switch to the References tab, and if there are fields available, enter any additional
information required.
- Switch to the Comments tab, and enter any additional comments relating to the Contact.
- Click the Application tool-bar push button: Add.
- Confirm that you wish to add the new record.
How Do I : Modify an existing Contact
- At the Contact field, locate the Contact.
- At the Group field, locate the Group you would
like to assign this Contact to.
- At the File As field, enter the name of the Contact record.
- At the Name field, enter the Title, First Name, Middle Name, Surname and Suffix where required.
- At the Job Title field, enter the Contact's job title.
- At the Company field, enter the company name the Contact works for.
- From the Correspond drop down list, select the method the Contact prefers to receive correspondence by.
- Select an address type from the Addresses drop down list, then enter the relevant information in the Address / Post Code fields.
- Click the This is the Mailing Address check box if the address is where mail should be sent to.
- Select from the four Phone Numbers drop down lists and enter the relevant information in the phone number fields.
- Select from the E-Mail drop down list and enter in the relevant e-mail address.
- At the Web field, enter the web address for the company the Contact works for.
- Refer to How Do I : Modify an existing Contact Relationship linking the Contact to an Entity to change Contact Relationships or How Do I : Delete an existing Contact Relationship linking the Contact to an Entity to remove Contact Relationships.
- Switch to the References tab, and if there are fields available, enter any additional
information required.
- Switch to the Comments tab, and enter any additional comments relating to the Contact.
- Click the Application tool-bar push button: Change.
- Confirm that you wish to change the record.
How Do I : Delete an existing Contact
- At the Contact field, locate the Contact.
- Click the Application tool-bar push button: Delete.
- Confirm that you wish to delete the record.
How Do I : Add a Contact Relationship to link the Contact to an Entity
- At the Contact field, locate the Contact.
- Click on the Relationships tab.
- At the Type field, select an Entity type.
- At the Entity field, locate the Entity to link the Contact to.
- At the Relationship field, locate the Contact Relationship.
- At the From field, enter the date the Relationship started.
- At the To field, if required, enter the date the Relationship ended.
- Click the Active check box, if the Relationship is currently active.
- Click the Right Hand Side Application tool-bar push button: Add.
- Repeat these steps to add more Contact Relationships.
- Click the Left Hand Side Application tool-bar push button: Change.
- Confirm that you wish to change the record.
How Do I : Modify an existing Contact Relationship linking the Contact to an Entity
- At the Contact field, locate the Contact.
- Click on the Relationships tab.
- Double click the row in the Relationships table to change.
- At the Type field, select an Entity type.
- At the Entity field, locate the Entity to link the Contact to.
- At the Relationship field, locate the Contact Relationship.
- At the From field, enter the date the Relationship started.
- At the To field, if required, enter the date the Relationship ended.
- Click the Active check box, if the Relationship is currently active.
- Click the Right Hand Side Application tool-bar push button: Change.
- Repeat these steps to change more Contact Relationships.
- Click the Left Hand Side Application tool-bar push button: Change.
- Confirm that you wish to change the record.
How Do I : Delete an existing Contact Relationship linking the Contact to an Entity
- At the Contact field, locate the Contact.
- Click on the Relationships tab.
- Double click the row in the Relationships table to change.
- Click the Right Hand Side Application tool-bar push button: Delete.
- Repeat these steps to delete more Contact Relationships.
- Click the Left Hand Side Application tool-bar push button: Change.
- Confirm that you wish to change the record.
How Do I : Export a Contact to Microsoft Outlook
- Contacts are exported in the vCard format which is compatible with applications such as Microsoft Outlook.
- At the Contact field, locate the Contact.
- Click the Application tool-bar push button: Export.
- The Windows Save dialog will show. Select a location to save the file and click the Save button.
- A message box will show asking if you want to open the file now. Click Yes. If you have a vCard compatible application installed, the Contact will open in the appropriate area of that application. For example, if you have Microsoft Outlook installed, the Contact screen will appear.
- Complete the steps the vCard compatible application requires to save the Contact.
Related Topics
Contacts are associated with the following Topics: