Open topic with navigation
Maintaining Contracts
- The Contract feature allows Contracts to be defined and associated with the suppliers.
- Contracts can contain details for the automatic generation of standing Purchase Orders.
Menu
Mandatory Prerequisites
Prior to creating a Contract, refer to the following Topics:
Screenshot and Field Descriptions: Contract Tab
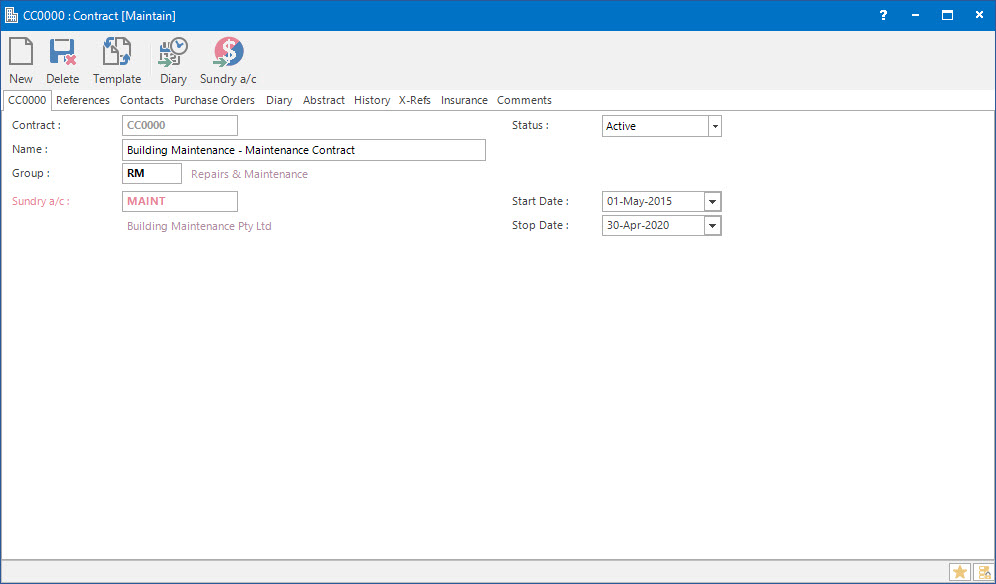
 Contract: this is the primary identifier for the Contract.
 Name: this is the friendly name given to the Contract.
Group: this determines the Group that the Contract belongs to. Groupings are useful in searches and reports.
Sundry a/c: this is the Sundry (Creditor) Account ID.
Status: this refers to the current status of the Contract. The options are:
Active: indicates that the Contract is current.
Casual: indicates that the Contract is casual.
Inactive: indicates that the Contract is inactive.
Start Date: this is the Contract Start Date.
The Start Date is only mandatory, if the Stop Date has been entered.
Stop Date: this is the Contract Stop Date.
Screenshot and Field Descriptions: Purchase Order Tab
The Purchase Order Tab on the Contract screen lists out all the standing purchase orders related to the Contract.
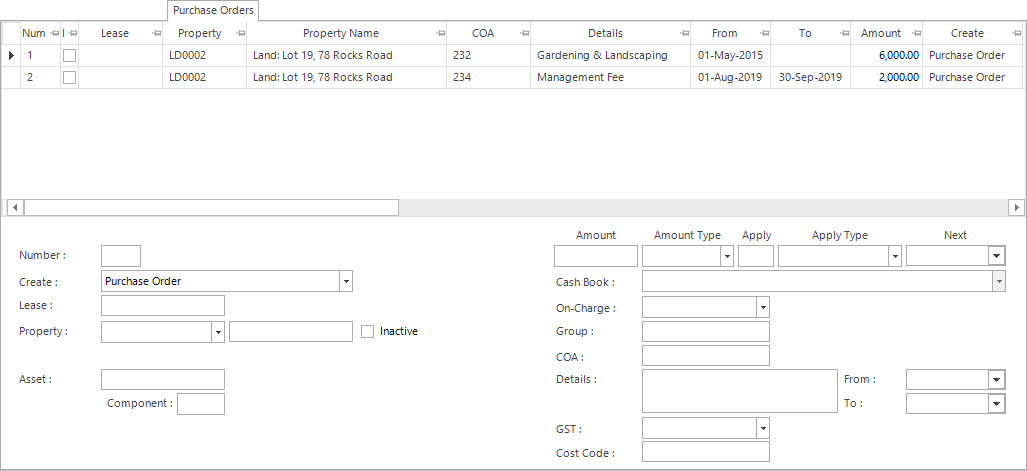
Purchase Orders table: this displays the standing Purchase Orders related to the parent entity. Double click a row to populate the fields below the table for editing.
The values in the following fields can be Added, Changed and Deleted using the Maintenance Push-Buttons (Right Hand Side).
Create: this is the drop down to select if a Purchase Order, Transaction or both needs to be created.
 Lease: this the Lease the Purchase Order will be raised for.
Property: this is the Property that the Purchase Order will be raised for.
Inactive: this check box is to nominate that the Contract Purchase Order should no longer be raised or has been entered for reference only.
Asset: this is the Asset the Purchase Order will be raised for.
Component: this is the Asset Component number the Purchase Order will be raised for.
Amount: this is the amount of the standing Purchase Order. Note that the value entered is tied in with the value selected in the Amount Type field, ie. if it is an annual amount, or a monthly amount, etc.
Amount Type: this is the how the value is going to be entered in the Amount field. The options are:
- Annual - the value entered in the Amount field is an annual value.
- Day - the value entered in the Amount field is a daily value.
- Month - the value entered in the Amount field is a monthly value.
- Week - the value entered in the Amount field is a weekly value.
Apply / Apply Type: these fields are combined to determine the frequency of the Purchase Order. A numeric multiplier is entered in the Apply field, while the type of period is selected in the Apply Type field. The options for the Apply Type field are:
- Months(Split/365) - a fixed amount is charged each month if the Purchase Order covers the whole month. If the Purchase Order does not cover the whole month then the split calculation is based on the number of days in the year.
- Months(Split/12) - a fixed amount is charged each month if the Purchase Order covers the whole month. If the Purchase Order does not cover the whole month then the split calculation is based on the number of days in the month.
- Periods - the amount is calculated based on the number of days in an Accounting Period.
- Days - the amount is calculated based on the number of days.
If Months(Split/365) or Months(Split/12) are selected in the Apply Type field the value in the Apply field works as follows:
- 1 - Purchase Orders will be created monthly.
- 3 - Purchase Orders will be created quarterly.
- 6 - Purchase Orders will be created half yearly.
- 12 - Purchase Orders will be created annually.
- 24 - Purchase Orders will be created bi-annually.
- etc.
Next: this is date when the next Purchase Order will be raised. This date must be manually entered the first time. The Contract Purchase Orders process will automatically update this date from then on.
Cash Book: this is the Bank account if the Transaction raised is going to be a Cash Sales / Cash Credit type transaction. Leave blank if an Invoice / Credit Note type transaction is to be raised.
On-Charge: this will be the on-charge status of any transactions created from the Purchase Order. If the transaction expense is going to be on-charged to Tenants (Debtors), using the On-Charge process, then select one of the following options:
- Automatic: the transaction will be on-charged based on the settings in the On-Charge Profile and the area of the Property.
- Manual: the transaction will be nominated to be on-charged. When the transaction is saved the user will need to specify how the transaction will be on-charged.
- Pending: the transaction will be nominated to be on-charged but put on hold for now.
 Group: this is the Contract Purchase Order Group used in the Contract Purchase Orders process for grouping purchase orders into the one transaction or separating them out.
COA: this is the Chart of Account for the Purchase Order transaction raised.
Details: this is the description of the Purchase Order. It will default to the value set up for the COA.
From / To: this is the date range the Purchase Orders will be created in.
GST: this is the GST settings for the Purchase Order. It will default to the type set up for the COA.
Inclusive: this check box is to nominate if the value in the Amount field will include GST or not. If this field is ticked, when the GST is calculated, the Purchase Order amount will be reduced by the GST. If this check box is not ticked, the Purchase Order amount will not be reduced and the GST will be added.
GST From: this is a historical field and current use is now irrelevant. It was used during the implementation of GST to allow contractual date based transactions to escape full GST.
Cost Code: this is the cost code for the Purchase Order transaction raised. This field can be set as optional, mandatory or not required on the COA set up screen.
Shared or Site Optional Tabs
Other than Tabs described specifically in this Topic, the following may also be available (depending on Site Settings):
How Do I : Add a new Contract
- At the Contract field, enter a new Contract ID or simply click on the Auto-Key button.
- At the Name field, enter the name of the Contract.
- At the Group field, locate the Contract Group you would
like to assign this Contract to.
- At the Sundry a/c field, select the required sundry a/c that you want to attach this Contract to.
- At the Status field, select the contract status from the drop down list.
- At the Start Date field, enter the start date of the contract. This field is mandatory only if the Stop Date has been entered.
- At the Stop Date field, enter the end date of the contract.
- Refer to How Do I : Add a standing Purchase Order to the Contract to add the Standing Purchase Orders linked to the Contract.
- Switch to the References tab, and if there are fields available, enter any additional information required.
- Switch to the Comments tab, and enter any additional comments relating to the Contract.
- Click the Application tool-bar push button: Add.
- Confirm that you wish to add the new record.
How Do I : Modify an existing Contract
- At the Contract field, locate the Contract.
- At the Name field, change the name of the Contract.
- At the Group field, change the Contract Group you would
like to assign this Contract to.
- At the Sundry a/c field, change the required sundry a/c that you want to attach this Contract to.
- At the Status field, change the contract status from the drop down list.
- At the Start Date field, change the start date of the contract. This field is mandatory only if the Stop Date has been entered.
- At the Stop Date field, change the end date of the contract.
- Refer to How Do I : Add a standing Purchase Order to the Contract, How Do I : Modify a standing Purchase Order on a Contract, or How Do I : Delete a standing Purchase Order from a Contract to add, change or delete the Standing Purchase Orders linked to the Contract respectively.
- Switch to the References tab, and if there are fields available, enter any additional information required.
- Switch to the Comments tab, and enter any additional comments relating to the Contract.
- Click the Application tool-bar push button: Add.
- Confirm that you wish to change the record.
How Do I : Delete an existing Contract
- At the Contract field, locate the Contract.
- Click the Application tool-bar push button: Delete.
- Confirm that you wish to delete the record.
A Contract record can only be deleted if there are no other records associated
with it.
How Do I : Add a standing Purchase Order to the Contract
- At the Contract field, locate the Contract.
- Click on the Purchase Orders tab.
- In the Create drop down list, select an option to create Purchase Order or Transaction or both Purchase Order and Transaction.
- At the Lease field, if required, enter the Lease.
- In the Property drop down list, select the required Property Type and enter the Property.
- If required, tick the Inactive check box, if the Contract Purchase Order is inactive or for reference only.
- At the Asset field, if required, enter the Asset.
- At the Component field, if required, enter the asset component.
- At the Amount field, enter the amount for the Purchase Order / Transaction to be raised.
- At the Amount Type field, select the appropriate option from the drop down list.
- In the Apply field, enter the numeric multiplier.
- At the Apply Type field, select the appropriate option from the drop down list.
- At the Next field, enter the date the Purchase Order / Transaction should start being raised.
- At the Cash Book field, select a Bank Account if the generated Transaction needs to be a Cash Sales / Cash Credit type. Leave blank to create an Invoice / Credit Note type transaction.
- At the On-Charge field, select the appropriate option if the generated Purchase Order / Transaction needs to be on-charged.
- At the Group field, if required, enter the Contract Purchase Order group.
- At the COA field, enter the COA for the Purchase Order / Transaction.
- The Details field will be automatically populated from the COA selected. Change the value if required.
- At the From field, enter the starting date of the Purchase Order / Transaction.
- At the To field, enter the end date range of the Purchase Order / Transaction. This field can be left blank.
- The GST field will automatically populate from the COA selected. Change the value if required.
- Tick the Inclusive check box if the Amount field will include GST. Otherwise the GST component will be calculated and added separately.
- The GST From date will default to the value set up for GST.
- At the Cost Code field, enter the cost code for the Purchase Order if required.
- Click the Right Hand Side Application tool-bar push button: Add.
- Repeat these steps to add (change or delete) more Purchase Orders.
- Click the Left Hand Side Application tool-bar push button: Change.
- Confirm that you wish to change the record.
How Do I : Modify a standing Purchase Order on a Contract
- At the Contract field, locate the Contract.
- Click on the Purchase Orders tab.
- For the maintenance of the Purchase Order items, the user has the following options:
- Add a new Purchase Order item by selecting values for the fields on the Purchase Orders table, then click the Right Hand Side Application tool-bar push button: Add.
- Change an existing Purchase Order item, by double clicking on the item from the Purchase Orders table and changing the values for the fields as required, then click the Right Hand Side Application tool-bar push button: Change.
- Delete an existing Purchase Order item, by double clicking on the item in the Purchase Orders table, then click the Right Hand Side Application tool-bar push button: Delete.
- If any of the Purchase Order items need to be cleared, click the Right Hand Side Application tool-bar push button: Wipe.
- Click the Left Hand Side Application tool-bar push button: Change.
- Confirm that you wish to change the record.
How Do I : Delete a standing Purchase Order from a Contract
- At the Contract field, locate the Contract.
- Click on the Purchase Orders tab.
- Double click the row in the Purchase Order Table to delete.
- Click the Right Hand Side Application tool-bar push button: Delete.
- Repeat these steps to delete more Purchase Orders.
- Click the Left Hand Side Application tool-bar push button: Change.
- Confirm that you wish to change the record.
Related Topics
Contracts are associated with the following Topics: